Zabbix 入门
安装

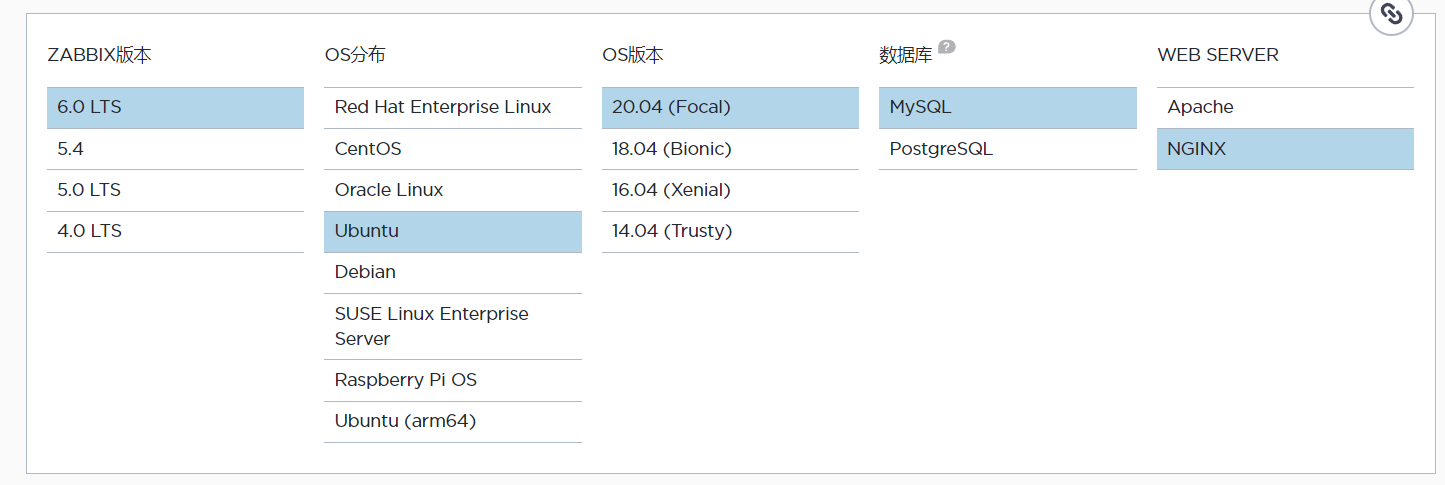
这里选用了如上的配置
1. 安装 Zabbix repository
|
|
2. 安装Zabbix server,Web前端,agent
|
|
3. 创建初始数据库
|
|
4. 导入初始架构和数据
|
|
5. 配置数据库
编辑配置文件 /etc/zabbix/zabbix_server.conf
DBPassword=password
6. 配置前端php
编辑配置文件 /etc/zabbix/nginx.conf
|
|
7. 启动Zabbix server 和 agent 进程
|
|
8. 配置 Zabbix
访问对应的web管理页,按照提示设置即可。
配置完成之后,登录的默认密码为 Admin zabbix
监控
监控mysql
1. 创建模板
或者直接在 /etc/zabbix/zabbix_agentd.d目录中创建 template_db_mysql.conf文件,然后输入如下内容:
#template_db_mysql.conf created by Zabbix for "Template DB MySQL" and Zabbix 4.2
#For OS Linux: You need create .my.cnf in zabbix-agent home directory (/var/lib/zabbix by default)
#For OS Windows: You need add PATH to mysql and mysqladmin and create my.cnf in %WINDIR%\my.cnf,C:\my.cnf,BASEDIR\my.cnf https://dev.mysql.com/doc/refman/5.7/en/option-files.html
#The file must have three strings:
#[client]
#user='zbx_monitor'
#password='<password>'
#
UserParameter=mysql.ping[*], mysqladmin -h"$1" -P"$2" ping
UserParameter=mysql.get_status_variables[*], mysql -h"$1" -P"$2" -sNX -e "show global status"
UserParameter=mysql.version[*], mysqladmin -s -h"$1" -P"$2" version
UserParameter=mysql.db.discovery[*], mysql -h"$1" -P"$2" -sN -e "show databases"
UserParameter=mysql.dbsize[*], mysql -h"$1" -P"$2" -sN -e "SELECT COALESCE(SUM(DATA_LENGTH + INDEX_LENGTH),0) FROM INFORMATION_SCHEMA.TABLES WHERE TABLE_SCHEMA='$3'"
UserParameter=mysql.replication.discovery[*], mysql -h"$1" -P"$2" -sNX -e "show slave status"
UserParameter=mysql.slave_status[*], mysql -h"$1" -P"$2" -sNX -e "show slave status"
2. 创建监控需要的用户
|
|
3. 配置
在 /var/lib/zabbix目录中创建 .my.cnf文件,文件内容如下:
[client]
user='zbx_monitor'
password='<password>'
监控 nginx
这里使用官方提供的 Nginx by http的方式,原理是定时拉取 ngx_http_stub_status_module的数据。
首先确认,nginx中已经集成这个模块,nginx -V 2>&1 | grep -o with-http_stub_status_module。
配置请求接口
在nginx 配置文件中配置即可,这里配置在 /etc/nginx/sites-available/default中。
|
|
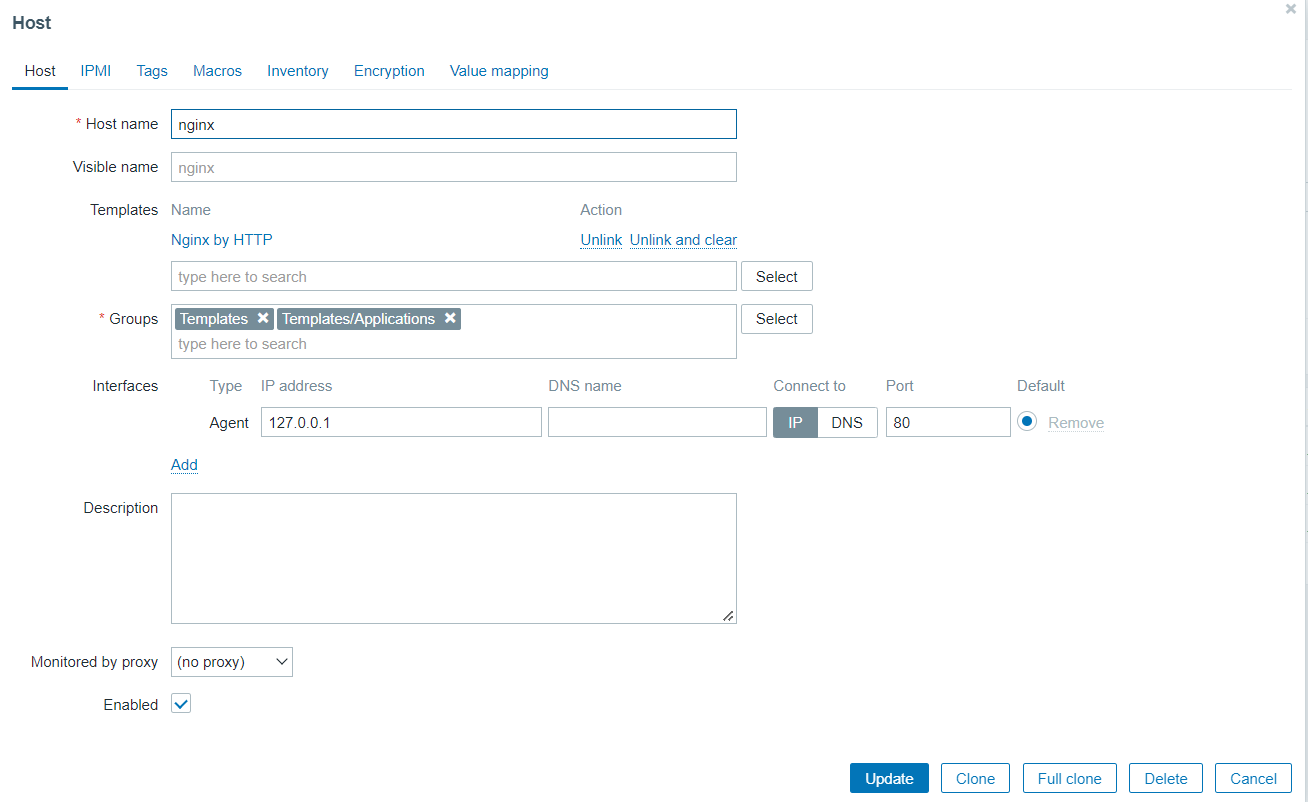
在zabbix 中配置主机

- 原文作者:SilentStorm
- 原文链接:https://silentstormic.top/post/head-first-zabbix/
- 版权声明:本作品采用知识共享署名-非商业性使用-禁止演绎 4.0 国际许可协议进行许可,非商业转载请注明出处(作者,原文链接),商业转载请联系作者获得授权。